Watch Out For Ice Damming !

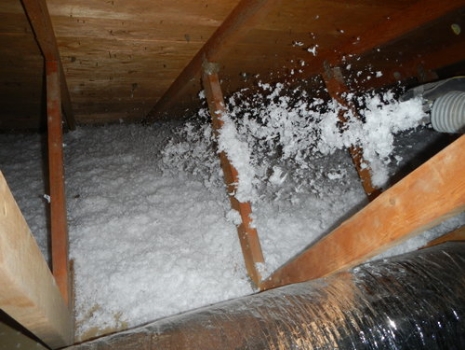
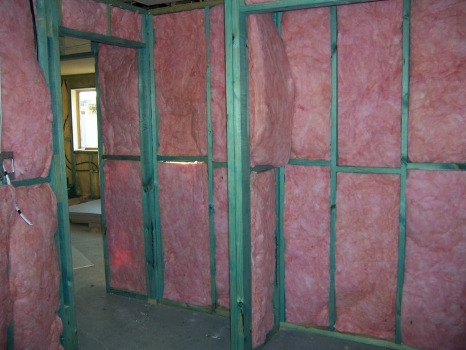
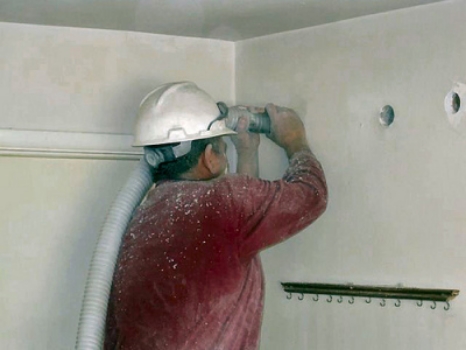
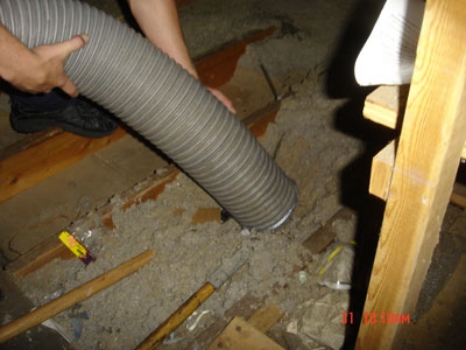
Diagram of the causes of ice damming and the potential for damage to shingles and other roofing componentsIce damming is a condition whereby a mass of ice builds up on the lower surface of the roofing substrate, predominantly during the freeze thaw cycle of extreme cold temperatures, and warmer temperatures.  It is a problem inherent to Calgary, with our Chinook warm spells.

The most likely cause is a lack of insulation along the outside edges of the attic, and an uneven gradient distribution of insulation between the center and outside perimeter. The problem is accelerated by an under insulated attic, with a poor vapor barrier, because warm air is allowed to freely leave the home, and penetrate into the attic, creating a warmth to the underside of the shingles.


When a large mass of snow is dumped on the roof, it is warmed by the warmer center of the attic, and runs down the roof, until it encounters a colder lower edge where there is little or no heat. 

The water freezes along this lower edge, getting under the shingles, and repeats over and over, until a dam of ice holds water on the roof for further freezing.  It is generally worst, where there are unheated overhangs larger than 8”.  When an extreme warm spell occurs, or spring temperatures, this ice will melt, occasionally penetrating the damaged shingles, and occasionally penetrating into the attic cavity itself. 

There is great potential for damage to the wall cavity below, if this occurs.  It is incumbent on every home owner to observe their roof during all seasons, and keep up with maintenance and the prevention of this condition.  Neglect of such circumstances can lead to water penetration and ice buildup in the attic, and possibly the wall cavity.

The best way to prevent ice damming, is to upgrade your attic insulation, and observe how snow melts on your roof after a snowfall.  With more insulation, both in the center mass, and the outside edges, you reduce the flow of heat from the home, into the attic, thus reducing the likely hood that snow will melt quickly, and then freeze into a dam at the lower edge.  Ice damming is a cumulative effect that damages the shingles over many years, until there is a failure and a roof leak.  It is not a condition that can occur in one season, or several months.

Should You Wait on EcoEnergy Announcement ?

Fortunately for the economy, it looks like the Harper government has decided to renew the EcoEnergy program in some form, and put up to 400 million in grant dollars back into the long running program.  Construction and renovation are Canada's primary economic driving force, and this kind of stimulus has two beneficial effects.  It helps homeowners save money on their energy consumption, and reduces our environmental footprint, as well as provides vital stimulus to the recovering Canadian economy.

Most studies show that for every dollar spent in the construction sector, there are 10 more dollars spent in associated industries.  Take a look around at your family and friends.  How many people do you know who are contractors, or sell carpet, furniture, architects, interior designers, or simply work at Home Depot or Rona ?

While the details have not been announced yet, many people ask us if they should wait until they are announced before upgrading their attic insulation ?  There are two ways to look at the answer with regards to attic insulation.  If you are simply considering an attic insulation upgrade, then the answer is a definite NO.  Because it will cost you several hundred dollars for the required audit, and follow up audit, you could be putting that money into your attic upgrade, which average less than  $1000.

Our on site estimator will do an analysis of your attic, and tell you everything you need to know about how much you have, and how much you need.  Also, we are specialists in this industry, where as auditors provide a valuable service, but they do not "specialize" in insulation and ventillation of your attic.  Even if you decide to go with an energy evaluation, you can get the pre-evaluation now, get the work done, and get the follow up evaluation after the grant is formally announced, and still get the benefit of the upgrades, plus some possible grant money.  Please contact your local authorized auditor for details on this.  There are three authorized auditors in Calgary: VerdaTech Energy, AmeriSpec Canada, and Atco Gas.

A second issue, is the inflation of pricing that will occur when the program is finally formalized.  Right now, prices are relatively stable, and we are offering some very competitive packages on attic upgrades.  If you wait until the fur hits the fan in the fall, when it's getting cold, labor and material prices will invariably climb, as well as extended and less reliable booking times.  As the weather starts to get cold in the fall, it will become more difficult to book an audit, and an insulation contractor, and it will probably cost you more.

Please take the time to contact the authorized auditors and discuss the ins and outs of the grant program system, they are the professionals in that area.

VerdaTech Energy, AmeriSpec Canada, and Atco Gas.

10 Ways to Save on Monthly Bills

The idea of watching the needle on your electric meter turn backward instead of forward is a wondrous concept for any homeowner.

Unfortunately, the materials needed to make this dream a reality -- solar panels, wind turbines, geothermal heating, a solar-powered water heater, recaptured rain water -- can total in the tens of thousands.

But you don't have to invest your life savings in green technology to save money on your heating and cooling bills. In fact, the first step in making your home more green doesn't cost any money at all.  Read on to learn the 11 simple projects that can be done over the course of a weekend to decrease your carbon footprint -- and keep your home from leaking money out the window.

1.Change Your Thinking

One of the biggest impacts you can make on the efficiency of your home and the cost of your utilities is to be more conscious about the amount of energy your home consumes. Basically, if it's not in use, turn it off.

Take a stroll through your house and take notice of the simple things that are costing you money. Turn off lights that are not in use; repair leaky faucets; turn up the fridge and the freezer; lower the temperature of your water heater; adjust your thermostat. These simple actions -- and the heightened awareness behind them -- are the first steps in making your home a well-tuned machine of energy efficiency.

Other eco-conscious tips for the future include upgrading to energy-efficient appliances and low-flow shower heads, taking shorter showers, air-drying your clothes and running the dishwasher and washing machine with full capacities.

You don't necessarily have to do with less to make a difference in your home's efficiency. You just need to be conscious and take action on the changes that can be made.

2. Audit Your Home

Many utility companies and climate-control specialists offer blower-door tests for pinpointing air leaks in your home. While these tests can cost upwards of $300, a little assistance from Mother Nature can also work in determining unwanted leaks. On the next windy day, burn a stick of incense or light a candle and carry it through your house looking for air movement. Take note of the questionable areas and move in closer to pinpoint the exact culprits. Mark the areas with a Post-It note or painter's tape for reference in step two.

While every home is unique, there are a few areas where infiltration shows up repeatedly in such tests: check the seam between the top of the foundation wall and the wood framing that runs around doors and windows; also check along baseboards, electrical outlets and switches mounted on exterior walls; and around fireplaces, laundry vents, attic hatchway doors and pull-down stairways, attic fans and pipe and wire chases.

The next step is to seal these leaks with caulk or insulating foam. A few minutes spent pinpointing and eliminating air leaks is an essential foundation to maintaining a comfortable and efficient home.

3. Do Windows

Upgrading all of the windows in your home to double-paned casings is a bold step in making your home more energy efficient, albeit a costly one. Adding storm windows, an extra pane of glass or plexi-glass to the exterior can offer almost as much efficiency for a fraction of the investment.

Both methods help to create a heat-trapping buffer that decreases energy loss and maintains interior comfort. As an even cheaper measure, consider applying a light- and heat-controlling film to your windows. 100-foot rolls typically sell for $150, and effectively block up to 60% of the sun's heat and 99% of UV rays.

4. Switch to LEDs

Compact fluorescent (LED) light bulbs use 70% less energy and last six- to 10-times longer than incandescent bulbs. According to a recent Consumer Reports study, by replacing a 60-watt incandescent bulb with a 13-watt compact fluorescent that offers the same amount of light, you could save more than $57 over the life of the LED.

This simple switch can make a dramatic impact in your monthly energy bill. Also, the price of LEDs has greatly decreased in recent years, making your start-up costs more bearable. Start by replacing the bulbs in your kitchen and bathroom -- two of the most-used rooms in your home, which also require lots of light. And don't forget about lamps that may be left on overnight or exterior lights that might escape your attention.

5. Insulate

Depending on when it was built, chances are your home is insufficiently insulated. Building codes for home insulation have changed greatly in the last 10 years, even more since the 1920s. Lucky for you, great strides have also been made in insulation technology.

Attic insulation can be added in easy-to-apply rolls or blown-in cellulose insulation made from recycled newspapers. For older home owners (pre-1950), you will probably need to add insulation to your walls as well. For this project, you might want to hire out the job, which requires drilling into each section between studs and blowing in insulation. The project can be time-consuming and tedious, but well worth the investment.

One thing to keep in mind: The better the insulation, the more the savings. Going 10% to 20% beyond the minimum insulation requirements in your area will only help increase your savings in the long run.

6. Replace Your Filters

A dirty air filter can reduce the efficiency of your central heating and cooling system by as much as 20%. Regularly changing or cleaning your air filters will help reduce your carbon footprint and can also help with your allergies or asthma. Either way, you'll certainly sleep better at night from a project that can take as little as five minutes.

7. Install a Programmable Thermostat

Almost half of the energy we use in our homes goes to heating and cooling. The best way to reduce this number is to follow this simple mantra: "68 in winter, 78 in summer." Programmable thermostats can help achieve this goal by not only regulating the temperature while you're at home, but also limiting usage when you are away.

Programmable units range from simple, timer-like devices to elaborate, multi-function units that provide special instructions to your climate control system based on the day of the week and time of day. Once programmed, these thermostats work behind the scenes, saving you money and anticipating climate control needs.

8. Baby Your Water Heater

Aside from lowering the temperature of your water heater, you can significantly help retain heat and decrease the amount of energy needed to heat water by simply wrapping insulation around the unit. Inexpensive insulating blankets are readily available at your local hardware store. Additionally, wrapping the piping that runs from the unit with pre-formed pipe insulation sleeves can lessen heat loss when carrying hot water to your faucets.

If you're ready for a new water heater, consider an upgrade to a tankless system that offers instant, on-demand hot water. Many states also offer rebates for upgrading to a solar-heated water system, the total cost for which runs around $10,000 or so -- an investment that will pay itself off in 10 to 15 years worth of savings.

9.Eliminate Ghost Usage

Even when turned off, electronics such as alarm clocks, microwave ovens, televisions, computers and cell phone chargers are sipping energy. The energy used to keep display clocks and memory chips working accounts for 5% of total domestic energy consumption.

The best way to eliminate this silent cost is to introduce a circuit breaker or power strip that can be completely turned off when electronics are not in use. Simply plug your entertainment center, computer or phone chargers into an inexpensive power strip that can easily stop the power flow with the flick of a switch. This ensures these electronics aren't adding to the ghost usage effect and hiking up your energy bill when they're not being used.

10. Plant a Tree

Shade provided by trees can reduce your air conditioning bill by as much as 10 to 15%. In winter, trees offer a wind break that can translate into a 25% reduction in heating fuel consumption. While it can take many years for a tree to reach full maturity and offer maximum benefits to your home, there are fast-growing varieties that can offer relief in the short term.

Evergreens, willows, magnolias and hybrid poplars can be strategically placed to start offering home-cooling shade in as little as three to five years. While an extra cost, purchasing mature trees can jump-start the process, and offer a return on your investment in dramatically less time. Additionally, crepe myrtles, oleander varieties and bamboo can offer shade over the course of a season.

11. Pull the Blinds

Curtains and blinds offer exceptional insulation properties in winter, and can help reflect the sun's energy in the summer to maintain a desirable temperature in your home. The trick is to take the extra step to make the free energy of the sun work in your favor.

In the summer, keep drapes and curtains closed on the sunny side of the house. In the winter, open those drapes and curtains to take advantage of the sun's heating power. Close all drapes, blinds or shades at night during winter months to make use of their insulating properties.

These 11 simple projects will make your home more energy efficient and save you money on your utility bills -- all with an affordable price tag and a quick turnaround. After all, it is the simple things in life that make people happy.

Heating Bills To Increase

Heating bills to increase for Calgary households

Regulated rate option customers to see a 21 per cent jump in natural gas bills

CALGARY - Calgarians will be paying 21 per cent more to stay warm this month, as Direct Energy Regulated Services ups its natural gas rates. Consumers not locked into a long-term contract will pay $3.900 per gigajoule of natural gas in December, up from $3.212 the previous month. A typical household will see the gas bill go up to an average of $154, an eight per cent increase from a year ago, Direct Energy said. The December rate reflects an average December market price of $3.648 per GJ, plus a 25.5-cent per GJ adjustment for November and prior months, the distributor said.

Source: Calgary Herald

Owens Corning Insulation Awarded GREENGUARD Certification

Owens Corning announced today that the company has been awarded GREENGUARD Certification, by the GREENGUARD Environmental Institute, for Owens Corning insulating products including: PINK fiber glass batts and rolls, all blowing wools. This certification demonstrates that the products contribute minimal emissions to indoor environments. With GREENGUARD Certification, building professionals, homeowners and others concerned about the products they use and live with, can be fully assured by an independent third party that certified Owens Corning products help maintain better, cleaner indoor air quality.

Owens Corning is the first manufacturer to receive GREENGUARD Certification for its extruded foam board products. Additionally, many of Owens Corning's insulating products available in Canada, including PINK fiber glass and rigid foam insulation, have also been awarded GREENGUARD Certification.

Being acknowledged by the GREENGUARD Environmental Institute is an honour and an affirmation of the all-around quality of our insulating products. And we're thrilled to be the first manufacturer to have certified extruded foam products, said George Kiemle, president of Owens Corning's Insulating Systems Business.

Receiving GREENGUARD Certification is beneficial for our customers, because indoor air quality and green building are of growing interest among construction professionals, Kiemle continued. Now, in addition to the assurance our customers get from the Owens Corning brand, this high-caliber third-party certification gives them added confidence that using our products results in structures that have few emissions a confidence they can share with customers who are concerned about the air quality of their indoor environments.

The only program of its kind, the GREENGUARD Certification and labelling program subjects interior products and building materials to rigorous emissions tests. The certification process involves the testing of products in dynamic environmental chambers for emissions of formaldehyde, volatile organic compounds (VOCs), respirable particles and other pollutants. The GREENGUARD Certification for indoor air quality complies with criteria set forth by the U.S. Environmental Protection Agency (EPA), the U.S. Green Building Council?s LEED? program, and other notable organizations.

Both the Occupational Safety and Health Administration (OSHA) and the EPA recently cited indoor air quality as a critical environmental problem in the U.S. today. Only low-emitting products that do not compromise the air quality of indoor environments are awarded GREENGUARD Certification and labeling.

Formaldehyde, as mentioned above, is one of several substances measured during the GREENGUARD testing process. All products awarded GREENGUARD Certification including certified Owens Corning fiber glass insulating products have been found to emit minimal amounts of formaldehyde, thereby supporting the conclusions of the Consumer Product Safety Commission (CPSC) and the EPA that fiber glass insulation is not a significant source of formaldehyde in the home.

We're pleased to award GREENGUARD certification to Owens Corning, said Henning Bloech, director of communications for GREENGUARD. Granting certification to such a recognized insulation brand helps our organization spread the message about the importance of indoor air quality to building professionals and homeowners everywhere.

Since we invented fiber glass insulation in the 1930s, Owens Corning has been committed to the development of environmentally friendly, safe, high-quality products. We applaud the GREENGUARD Environmental Institute for urging more and more manufacturers to do the same, said Kiemle. This certification goes hand in hand with our continued dedication to promote energy efficiency, an issue that is also critical to the environment and the sustainability of our natural resources.

Owens Corning is a world leader in building materials systems and composite systems. Founded in 1938, the company had sales of $4.9 billion in 2002. Additional information is available on Owens Corning's Web site at www.owenscorning.com or by calling the company?s toll-free General Information line 1-800-GETPINK.

The GREENGUARD Environmental Institute, founded in 2001, is a global, Washington D.C.-based, non-profit organization with a scientific, third-party board to establish indoor air quality standards for interior products and building materials. An independent organization, the GREENGUARD Environmental Institute is not affiliated with or sponsored by any manufacturer or industry. The Institute?s goal is to improve public health and quality of life by encouraging and helping manufacturers to build better, safer products and uphold environmental practices in product development, manufacturing and distribution. For more information, please visit www.greenguard.org.

Ten Suggestions To Keep Your Home Cool

Now that summer is officially here, and Calgary is getting it's first real heat wave, let’s get to those cooling tips. Some of the tips are simple things you can do yourself. Some are more involved are likely are best handled by a contractor.

houselink1. Keep the heat out! During the day, if it’s cooler inside than outside, keep windows shut. And keep window shades down to block out direct sunlight. Use light or reflective window coverings. Open the windows at night if it’s cooler outside than in. Solar shades can help. And the more ambitious project, new low-e windows with a low “solar heat gain coefficient” can block the heat from the sun. Single pane windows can turn your home into a GREENHOUSE, which is great if you want to grow tomatoes in your living room.

2. Ceiling fans (and other fans) help you stay comfortable—but only while you’re in the room. The fan motors actually generate heat, so turn them off when you’re not there. Another trick is to turn on the the "summer fan" option of your furnace. This will run the furnace fan, without the heat, and exchange the air in your home. It's particularly useful if you do it in the early evening when things start to cool down.

3. Use a bath fan vented to the outside to remove the heat and moisture created by showering. If you don’t have a bath fan, install one.

4. Similarly, use a kitchen exhaust fan to remove heat and moisture created by cooking. This has the added benefit of removing pollutants, especially if you cook with gas.

5. Use efficient lighting and appliances. Incandescent and halogen lights actually use most of their energy creating heat instead of light. Not only does this means you’re overpaying for lighting, but in the summer you’re creating a lot of unwanted heat in the rooms you’re trying to keep cool. Compact florescent light bulbs have improved greatly over the past several years. The humming, slow starts, and weird colours of years past are gone.

6. Do you have a forced air heating or cooling system? If so, make sure to have adequate attic insulation to keep that cool air in. As much as 30% of the air you cool can escape outside through a poorly insulated ceiling.

7. Insulate and air-seal your attic. If your home was built to the building code, it should have an adequate vapour barrier, already installed. In the summer, temperatures in the attic often climb to more than 140 degrees. Proper insulation can keep this heat from conducting down into your home.

8. If you have a central air-conditioner, keep it tuned up. If it’s more than 10 years old, consider replacing with a high-efficiency unit, one that at least qualifies for ENERGY STAR. If your buying a window air-conditioner or dehumidifier, look for the ENERGY STAR, too.

9. Planting deciduous trees on the south and west sides of a house can help keep your home cool in the summer. In many parts of the country, maples, oaks, and birches are good trees to consider. Because they drop their leaves in the fall, they let sunlight through to help warm your house in the winter.

10. To really find the trouble spots in your home, and to be sure that they’re addressed properly, get a comprehensive home assessment like the eco-Energy assessment.

And whether you do the work yourself or you have it done by a contractor, after you tighten the house you should have any combustion equipment like furnaces and water heaters tested to make sure they’re running safely and efficiently.


Areas That Need Insulation

Home insulation is an important part of your house and a properly as well as adequately insulated house is essential not only to save energy cost and meeting energy standards but also the occupants in the house can live comfortably. With that being said even though home insulation is important, not every part of the house requires insulation. To find out which area or part of your home requires insulation, read on. The following paragraphs describe a couple of do-it-yourself (diy) steps in which you can take to easily determine the area or parts of your house that requires adequate insulation.

Basically, the following areas of your house are the area or parts of your house that requires home insulation. You can refer to the diagram below to determine where to insulate. 

1 Ceilings below an unheated area.

2 “Knee” walls of a finished attic level room.

3 Floor of a crawl attic.

4 The sloping portion of the roof in a finished attic. Leave a airspace between insulation and roof.

5 Exterior walls.

6 Floor above cold crawl spaces. Floors above a porch or an unheated garage.

7 Walls of a heated basement.

In addition to the need for insulation of the building shell (exterior walls, ceilings, and floors), all hot-water pipes and heating as well as cooling ducts that pass through unheated portions of the house (such as crawl space, garage, or unfinished attic) must be insulated. Most houses usually have no more than 1 or 2 inches of insulation wrapped around ducts in unheated areas. Because of increasing fuel costs, this is considered minimal for most areas, and additional insulation can usually be justified. Check the condition of the insulation. Are there any loose, torn, or missing sections? Also, if there are any exposed duct joints, check them to see if they are sealed tightly. When the ducts are used exclusively for air conditioning or serve a dual function (such as heating and air conditioning), the outside of the insulation should be covered with a vapor barrier to prevent condensation. A vapor barrier, however, is not needed on ducts used only for heating. If there is a vapor barrier on the ducts, check its condition. Look for torn and missing section. All vapor-barrier joints must be tightly sealed.

If the domestic hot water is produced in a tank-type water heater located in an unheated area, the tank should be covered with an insulation jacket. These jackets can be purchased in most building-supply or hardware stores. Although tank-type water heaters are normally insulated by the manufacturer, by installing an outer insulation jacket, you will further reduce heat loss and thereby minimize the energy needed to maintain the desired water temperature. The temperature of the hot water should not exceed 140ºF. Temperatures in excess of 140ºF are not only wasteful of energy but will also shorten the life of the water heater.

Simply put, all the exterior walls, floors and ceiling that have contacts with unheated areas such as attic, garage, crawl space and basement requires insulation. Other than the structure of your house that requires insulation, the water pipes, air conditioning ducts as well as water heater requires proper insulation as well to reduce heat loss.

Draft-Proofing Your Electrical Outlets

The first rule in lowering your heating bill is to prevent cold air from getting into your house. We do this, of course, with insulated walls, ceilings, and floors. What happens, however, when you make a hole in that wall or ceiling or floor for some particular reason?

That's when you install something to fill up that hole like a window or door or vent. All of these are specially designed to prevent air infiltration, of course. Even then, you need to add weatherstripping and caulking to ensure that no cracks remain.

There's another category of holes we make in walls, where these holes don't go all the way through — these holes are for electrical outlets and light switches. The typical exterior wall in a house is made with 2"x4" or 2"x6" studs with sheathing and siding on the outside and sheetrock on the inside. Between the studs should be as much batt insulation as will fit snugly. Electrical outlets are then installed in a plastic box about 3" deep that is either shoved or cut into the insulation. Anyone who has worked with an electrician can tell you that electricians are not worried about insulation. For electrical outlets on exterior walls, there is typically little or even no insulation between the outdoors and the inside of the house.

Renovation Tax Credit Stimulus

Effective Jan. 27, any Canadian who spends money on home renovations will be eligible to receive up to $1,350 in tax relief, thanks to the new Home Renovation Tax Credit proposed in the Government's Economic Action Plan.

"Each time a Canadian invests in home renovations, they are helping to create jobs in construction and building supplies in their own community," said the Honourable Lisa Raitt, Minister of Natural Resources Canada. "By providing an incentive for Canadians to invest in their homes, we are also encouraging them to invest in local jobs."

To highlight the kind of projects that will be eligible under this plan, the Minister visited a Victoria-area home renovation site and met with a local contractor who will be better able to protect and create jobs thanks to the additional home renovation projects that will be encouraged through this tax credit.

The Home Renovation Tax Credit will provide a one-year, temporary 15% income tax credit on eligible home renovation expenditures for work performed, or goods acquired, between January 27, 2009 and February 1, 2010. The credit may be claimed on eligible expenditures exceeding $1,000 but not more than $10,000.

The Home Renovation Tax Credit is one of several initiatives designed to help homeowners and homebuyers contained within the Government's Economic Action Plan. Budget 2009 also announced $300 million over two years for homeowners looking to make their homes more energy efficient.

This government is taking steps to help Canadians control their energy costs and keep more money in their pockets. Minister Raitt also announced today the Government of Canada has reintroduced legislation to modernize the Energy Efficiency Act, and has made a series of improvements to Canada's Energy Efficiency Regulations. By 2010, the regulatory changes alone will allow Canadians to save $530 million in energy costs.

Before homeowners, homebuyers, and local construction and building supply workers can benefit from these new initiatives, Parliament must pass the 2009-2010 Federal Budget.

Why Upgrade Your Insulation

When it comes to energy-efficient renovations, an often overlooked home upgrade is insulation. While replacement windows and high-efficiency furnaces receive much of the attention, it’s important to remember that improving the attic, wall and basement insulation of your home can provide a lot of value for your investment!

Recently, we completed a home upgrade in Kelowna, BC, that offered an opportunity to showcase the process of upgrading insulation. Typical of older homes, this property has very little to no insulation. Built in the 1940’s, this bungalow style home with raised crawl space contains a tar paper air barrier, ship lap construction with lath and plaster walls. The only insulation to be found is wood shavings in the walls and ceilings

To start, we upgraded the insulation in the crawl space. Generally homeowners don’t think of their basement or crawl space as a prime source of heat loss, yet basements can account for 20 to 30 per cent of a home’s total.

The steps we’ve taken to insulate the basement are:

1) A moisture barrier (polyethylene 6-ml) is installed on the cold side of your insulation and serves to protect the insulation from water and moisture coming in from the outside wall.

2) Install batt insulation between the studs next to the moisture barrier.

3) A vapour barrier is installed on the warm side of the insulation. It serves to keep moisture in your home from penetrating into the wall cavity.

4) Wall covering such as gyproc or wallboard is used to finish the wall.

Next up, we’re insulating the walls using blown-in insulation. Blown-in insulation should be done by an experienced contractor since it requires the use of special pressurized equipment, which significantly reduces the amount of settling of loose-fill insulation after installation. The contractor must ensure each cavity is filled with insulation. The steps we’ve taken to insulate the walls are:

1) Identifying cross blocking (fire-stops) in the walls, and ensuring that holes are drilled to give access to all spaces in the walls.

2) Filling hollow corner posts, overhangs and other odd spots

3) After final inspection, making sure the drill holes are filled with cork and high-quality exterior caulking.

Finally, we turned our attention to the attic insulation which is typically the easiest and most cost effective way to make your home more efficient. The amount of insulation you can install in your attic is determined by the size of the joists and whether or not your attic has a floor. A settle density of R-32 to R-40 is preferable in most instances, but is not always possible. In the case of the Kelowna residence, we used loose-fill insulation and the steps we’ve taken to complete the attic insulation are:

1) Loose-fill insulation is poured on top of the air barrier and vapor barrier. It’s leveled out to maintain an even depth.

2) Pour the insulation to fill all nooks and crannies.

3) At the eaves, we take care to keep the insulation from blocking the ventilation of from disappearing into the eaves space.

4) We’re careful not to insulate to closely around flue pipes and gas vents

5) We make sure to seal the attic hatch.

In closing, keeping your home heated is difficult, particularly in Canada, where we live in a colder climate. Remember, heating costs account for more than 50 per cent of the energy used in your home, therefore, adding insulation will improve the comfort of your house and give you more value for your energy dollar.